жҲ‘д»ҘеүҚз”Ёиҝҷз§ҚOLEDеұҸејҖеҸ‘иҝҮеҮ ж¬ҫдә§е“ҒпјҢеҪ“ж—¶и®ҫи®Ўдә§е“ҒйңҖжұӮжҜ”иҫғз®ҖеҚ•пјҢз•ҢйқўйҷӨдәҶз®Җжҳ“зҡ„еӣҫеҪўд№ӢеӨ–пјҢе°ұжҳҜж–Үеӯ—дҝЎжҒҜпјҢйғҪжҳҜиҮӘе·ұи®ҫи®Ўзҡ„UIз•ҢйқўгҖӮ
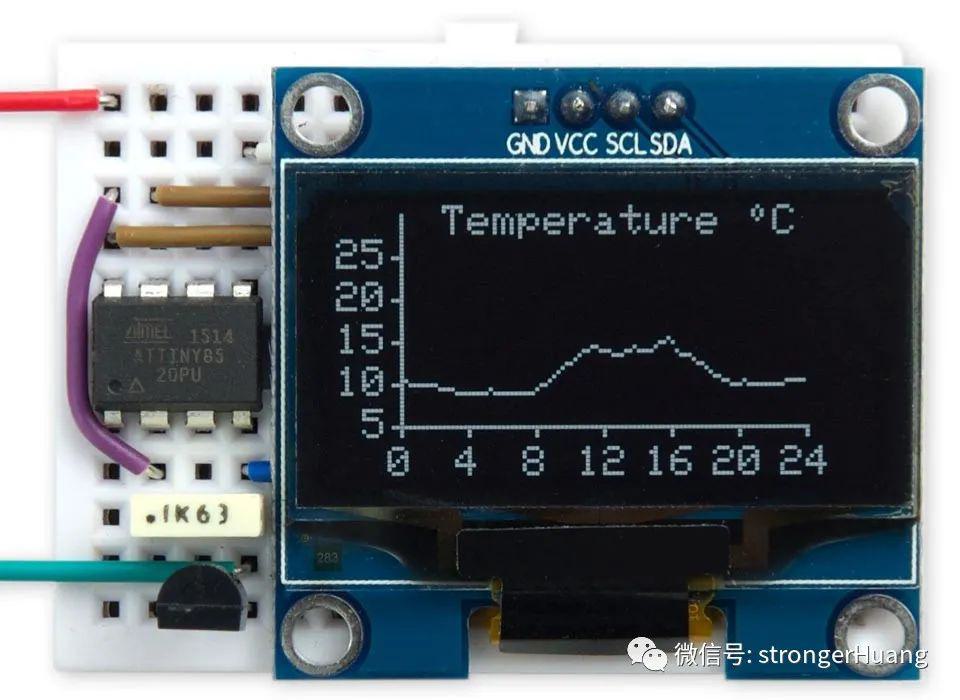
д»ҠеӨ©з»ҷеӨ§е®¶еҲҶдә«дёҖдёӢз”Ё128x64 OLEDеҒҡзҡ„жё©еәҰжҳҫзӨәз•ҢйқўпјҢеҰӮдёӢеӣҫпјҡ
1
д»Ӣз»ҚиҜҘ128x64 OLEDдёәеҚ•иүІжҳҫзӨәеұҸпјҢеҹәдәҺSSD1306й©ұеҠЁеҷЁиҠҜзүҮзҡ„OLEDжҳҫзӨәеҷЁгҖӮ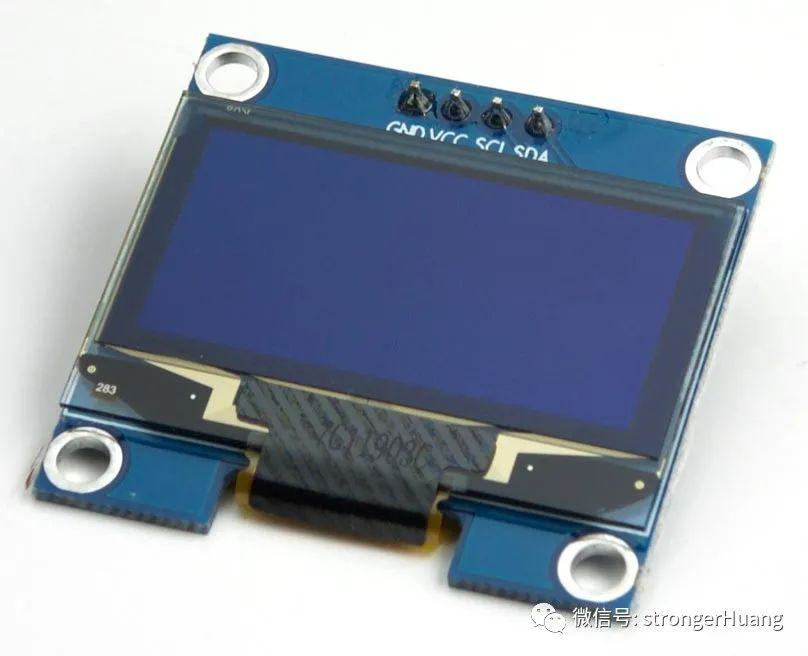
иҝҷз§Қ128x64 OLEDеёёи§Ғжңү0.96еҜёзҡ„пјҢд№ҹжңү1.3иӢұеҜёзҡ„пјҢд»ҘеүҚжңүзҡ„е®ўжҲ·е«Ң0.96еҜёеӨӘе°ҸпјҢжүҖд»Ҙе°ұз”ЁдәҶ1.3иӢұеҜёзҡ„еұҸ幕пјҢдҪҶд»·ж јз•ҘиҙөдёҖзӮ№гҖӮ
еңЁиҝҷз§Қзұ»еһӢзҡ„жҳҫзӨәеҷЁдёҠжү§иЎҢеӣҫеҪўе‘Ҫд»Өзҡ„йҖҡеёёж–№жі•жҳҜдҪҝз”ЁRAMзј“еҶІеҢәпјҡе°ҶжүҖжңүеӣҫеҪўз»ҳеҲ¶еҲ°иҜҘзј“еҶІеҢәдёӯгҖӮ然еҗҺпјҢеҪ“дҪ иҰҒжӣҙж–°жҳҫзӨәж—¶пјҢе°Ҷж•ҙдёӘзј“еҶІеҢәеӨҚеҲ¶еҲ°жҳҫзӨәдёӯгҖӮ
е’Ңиҝҷз§ҚжЁЎз»„йҖҡдҝЎпјҢжңүI2CпјҢд№ҹжңүSPIпјҢе…·дҪ“зңӢдҪ йңҖжұӮгҖӮ

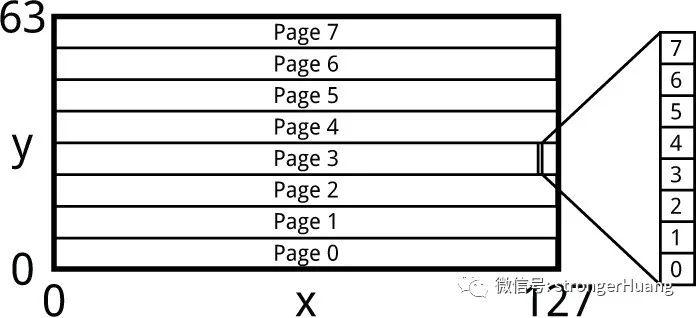
жҳҫзӨәеӨ§е°Ҹе’Ңеқҗж Үпјҡ128x64пјҢйЎҫеҗҚжҖқд№үе°ұжҳҜжЁӘеқҗж Ү128дёӘзӮ№пјҢзәөеқҗж Ү64дёӘзӮ№пјҢеӣҫеҪўеә“еҒҮе®ҡеҺҹзӮ№пјҲ0пјҢ0пјүеңЁе·ҰдёӢи§’пјҢеӣ жӯӨеҸідёҠи§’жҳҜпјҲ127пјҢ63пјүгҖӮ
жҳҫзӨәеұҸеҲҶдёәе…«дёӘ8еғҸзҙ й«ҳйў‘ж®өпјҢз§°дёәйЎөйқўпјҢдёҖдёӘеӯ—иҠӮеҜ№еә”дәҺ8еғҸзҙ зҡ„еһӮзӣҙеҲ—пјҢе…¶дҪҚйЎәеәҸеҰӮдёӢеӣҫжүҖзӨәпјҡ
дёӢйқўејҖе§Ӣи®Іиҝ°еӣҫеҪўеә“пјҡ
2
APIжҺҘеҸЈиҜҙжҳҺеә•еұӮзҡ„йҖҡдҝЎе’Ңй©ұеҠЁпјҢиҝҷйҮҢе°ұдёҚжҸҸиҝ°дәҶпјҢи®Іиҝ°дё»иҰҒзҡ„APIжҺҘеҸЈпјҡ
ClearDisplay()пјҡжё…йҷӨжҳҫзӨәгҖӮ
InitDisplay()пјҡеҲқе§ӢеҢ–жҳҫзӨәгҖӮ
PlotPoint(xпјҢy)пјҡеңЁ(xпјҢy)еӨ„з»ҳеҲ¶дёҖдёӘзӮ№гҖӮ
MoveTo(xпјҢy)пјҡе°Ҷз»ҳеӣҫдҪҚзҪ®з§»еҠЁеҲ°(xпјҢy)гҖӮ
DrawTo(xпјҢy)пјҡд»Һз»ҳеӣҫдҪҚзҪ®еҲ°(xпјҢy)з”»дёҖжқЎзәҝгҖӮ
PlotCharacter(cпјҢxпјҢy)пјҡз»ҳеҲ¶ASCIIеӯ—з¬ҰcпјҢеқҗж Үдёә(xпјҢy)гҖӮ
PlotText(s)пјҡд»ҺеҪ“еүҚз»ҳеӣҫдҪҚзҪ®ејҖе§ӢпјҢз»ҳеҲ¶зј“еӯҳдёӯзҡ„ж–Үжң¬еӯ—з¬ҰдёІгҖӮ
3
APIжәҗз Ғ1.InitDisplay()еҲқе§ӢеҢ–жҳҫзӨә
void InitDisplay () { Wire.beginTransmission(address); Wire.write(commands); Wire.write(0xA1); Wire.write(0xAF); Wire.endTransmission();}void Single (uint8_t x) { Wire.write(onecommand); Wire.write(x);}3.ClearDisplay() жё…жҘҡжҳҫзӨә
void ClearDisplay () { for (int p = 0 ; p < 8; p++) { Wire.beginTransmission(address); Single(0xB0 + p); Wire.endTransmission(); for (int q = 0 ; q < 8; q++) { Wire.beginTransmission(address); Wire.write(data); for (int i = 0 ; i < 20; i++) Wire.write(0); Wire.endTransmission(); } }}4.PlotPoint()з”»дёҖдёӘзӮ№
void PlotPoint (int x, int y) { Wire.beginTransmission(address); //ең°еқҖ Single(0x00 + ((x + 2) & 0x0F)); Single(0x10 + ((x + 2)>>4)); Single(0xB0 + (y >> 3)); Single(0xE0); //иҜ»еҸ–并дҝ®ж”№еҶҷе…Ҙ Wire.write(onedata); Wire.endTransmission(); Wire.requestFrom(address, 2); Wire.read(); int j = Wire.read(); Wire.beginTransmission(address); Wire.write(onedata); Wire.write((1<<(y & 0x07)) | j); Single(0xEE); // Cancel read modify write Wire.endTransmission();}5.MoveTo()移еҠЁз»ҳеӣҫдҪҚзҪ®
void MoveTo (int x, int y) { x0 = x; y0 = y;}6.DrawTo() з”»дёҖжқЎзәҝ
void DrawTo (int x, int y) { int sx, sy, e2, err; int dx = abs(x - x0); int dy = abs(y - y0); if (x0 < x) sx = 1; else sx = -1; if (y0 < y) sy = 1; else sy = -1; err = dx - dy; for (;;) { PlotPoint(x0, y0); if (x0==x && y0==y) return; e2 = err<<1; if (e2 > -dy) { err = err - dy; x0 = x0 + sx; } if (e2 < dx) { err = err + dx; y0 = y0 + sy; } }}7.PlotChar()еҶҷдёҖдёӘеӯ—з¬Ұ
void PlotChar (int c, int x, int y) { int h = y & 0x07; for (int p = 0; p < 2; p++) { Wire.beginTransmission(address); Single(0xB0 + (y >> 3) + p); // Page for (int col=0; col<6; col++) { Single(0x00 + ((x+2+col) & 0x0F)); // Column low nibble Single(0x10 + ((x+2+col)>>4)); // Column high nibble Single(0xE0); // Read modify write Wire.write(onedata); Wire.endTransmission(); Wire.requestFrom(address, 2); Wire.read(); // Dummy read int j = Wire.read(); Wire.beginTransmission(address); Wire.write(onedata); int bits = ReverseByte(pgm_read_byte(&CharMap[c-32][col])); Wire.write((bits<<h)>>(p<<3) | j); Single(0xEE); // Cancel read modify write } Wire.endTransmission(); }}7.PlotText() еҶҷж–Үжң¬
void PlotText(PGM_P s) { int p = (int)s; while (1) { char c = pgm_read_byte(p++); if (c == 0) return; PlotChar(c, x0, y0); x0 = x0 + 6; }}3
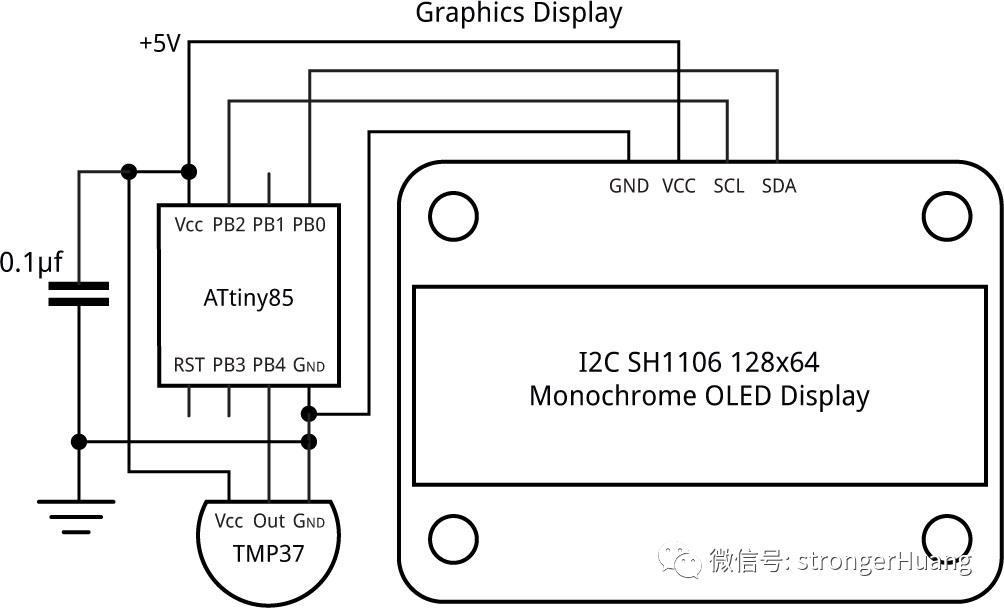
е®һдҫӢ1.иҜҙжҳҺжң¬дҫӢзЁӢдёәз®ҖеҚ•Demoпјҡ15еҲҶй’ҹи®°еҪ•дёҖж¬Ўжё©еәҰпјҢ并е°Ҷе…¶з»ҳеҲ¶еңЁжҳҫзӨәеұҸдёҠпјҢзІҫеәҰдёә0.5В°CгҖӮз”өи·Ҝпјҡ
2.DemoзЁӢеәҸ
const int Now = 1547; // жҜ”еҰӮи®ҫзҪ®ж—¶й—ҙдёәпјҡ15:47unsigned long StartMins = (unsigned long)((Now/100)*60 + (Now%100));
void loop () { unsigned int SampleNo = StartMins/15; // з»ҳеҲ¶жё©еәҰеӣҫ int x1 = 16, y1 = 11; int yscale = 2; MoveTo(26, 56); PlotText(PSTR("Temperature ~C")); //жЁӘиҪҙ MoveTo(x1, y1); DrawTo(x1+96, y1); for (int i=0; i<=24; i=i+4) { int mark = x1+i*4; MoveTo(mark, y1); DrawTo(mark, y1-2); int tens = i/10; if (tens != 0) { PlotChar(tens+'0', mark-6, y1-12); PlotChar(i%10+'0', mark, y1-12); } else PlotChar(i%10+'0', mark-3, y1-12); } //зәөиҪҙ MoveTo(x1, y1); DrawTo(x1, y1+50); for (int i=5; i<=25; i=i+5) { int mark = y1+i*yscale-10; MoveTo(x1, mark); DrawTo(x1-2, mark); int tens = i/10; if (tens != 0) PlotChar(tens+'0', x1-15, mark-3); PlotChar(i%10+'0', x1-9, mark-3); } for (;;) { //жҜҸ15еҲҶй’ҹжӣҙж–°дёҖдёӢ while ((unsigned long) ((StartMins + millis()/60000)/15)%96 == SampleNo); // Time to take a new reading SampleNo = (SampleNo+1)%96; int Temperature = (analogRead(A2)*25)/233; PlotPoint(SampleNo+x1, Temperature-10+y1); }}з»“еҗҲDemoдҫӢеӯҗжҳҜдёҚжҳҜеҫҲз®ҖеҚ•пјҢеҲҶдә«жң¬ж–Үзӣ®зҡ„жҳҜдёәдәҶи®©еӨ§е®¶еӨҡеҖҹйүҙеҲ«дәәзҡ„дёҖдәӣи®ҫи®ЎжҖқи·ҜпјҢиҮӘе·ұејҖеҸ‘дә§е“Ғзҡ„ж—¶еҖҷдёҚиҮідәҺйҷ·е…ҘеғөеұҖгҖӮ
еҰӮжһңеӨ§е®¶е–ңж¬ўпјҢжҲ‘дәүеҸ–д»ҠеҗҺеӨҡеҲҶдә«дёҖдәӣзұ»дјје°ҸдҫӢеӯҗпјҢдёәеӨ§е®¶жҸҗдҫӣдёҖдәӣи®ҫи®ЎжҖқи·ҜгҖӮ
~END~
зүҲжқғеЈ°жҳҺпјҡж–Үз« иҪ¬иҮӘзҪ‘з»ңгҖӮзүҲжқғеҪ’еҺҹдҪңиҖ…жүҖжңүпјҢеҰӮжңүдҫөжқғпјҢиҜ·иҒ”зі»жҲ‘们еҲ йҷӨпјҒ
е…іжіЁжҲ‘们пјҢ收иҺ·жӣҙеӨҡз”өеӯҗжҠҖжңҜ
в–Ҫ
еҘҪж–ҮжҺЁиҚҗ
гҖҗзӮ№еҮ»еӣҫзүҮйҳ…иҜ»гҖ‘
в–Ҫ
жӮЁзҡ„зӮ№иөһе’ҢеңЁзңӢпјҢжҳҜеҜ№жҲ‘жңҖеӨ§зҡ„йј“еҠұпјҒ